Wednesday, June 29, 2016

Pesto Recipe

Ingredients
½ clove garlic , chopped
Sea salt
Freshly ground black pepper
3 good handfuls fresh basil , leaves picked and chopped
1 handful pine nuts , very lightly toasted
1 good handful Parmesan cheese , freshly grated
Extra virgin olive oil
1 small squeeze lemon juice , optional


Method
  1. Pound the garlic with a little pinch of salt and the basil leaves in a pestle and mortar, or pulse in a food processor. 
  2. Add a bit more garlic if you like, but I usually stick to ½ a clove. 
  3. Add the pine nuts to the mixture and pound again. 
  4. Turn out into a bowl and add half the Parmesan. 
  5. Stir gently and add olive oil – you need just enough to bind the sauce and get it to an oozy consistency.
  6. Season to taste, then add most of the remaining cheese. 
  7. Pour in some more oil and taste again. 
  8. Keep adding a bit more cheese or oil until you are happy with the taste and consistency.
  9. You may like to add a squeeze of lemon juice at the end to give it a little twang, but it’s not essential. Try it with and without and see which you prefer.


Source: http://www.jamieoliver.com/recipes/vegetables-recipes/pesto/#XJ6Fi6UbkcJELoY0.99

Coleslaw Dressing Recipe


Ingredients
1/2 cup mayonnaise
2 tablespoons white sugar
1 1/2 tablespoons lemon juice
1 tablespoon vinegar
1/2 teaspoon ground black pepper
1/4 teaspoon salt
Add all ingredients to list

Directions
Whisk mayonnaise, sugar, lemon juice, vinegar, pepper, and salt together in a bowl until smooth and creamy.

Tuesday, June 21, 2016

Pizza Dough & Breadsticks by Lauren


Ingredients
For the pizza dough-
1 cup warm water
2 1/4 teaspoons active dry yeast
1 tablespoon honey {or sugar}
2 teaspoons salt
2 tablespoons olive or canola oil
3 cups bread flour {give or take 1/2 cup...depending on the heat & humidity}

For the cheesy garlic bread sticks-
1/2 recipe Fail-Proof Pizza Dough from above
2 tablespoons softened salted butter
2 cloves garlic, finely minced
1/4 cup grated parmesan cheese {use the real stuff!}
1/4 pound grated mozzarella cheese
{salt & pepper, if desired}

Directions

For the pizza dough:
  1. In a large mixing bowl, preferably that of a stand mixer, stir yeast and honey into warm water. 
  2. Sit for 5-10 minutes or until bubbles form and mixture starts to foam. This tells you that the yeast is alive and kicking. 
  3. Pour in salt, oil and half the flour and mix. Once that flour is incorporated, start adding flour in bit by bit until you get the pizza dough to the consistency you want: slightly tacky, but when you touch it it doesn't stick to your hands. 
  4. Once you reach this stage, knead for 6 minutes. Turn a timer on and walk away! Resist the temptation to stop earlier than 6 minutes! That seems to be the magical number. 
  5. The dough should be smooth and easy to work with. And the bowl should be clean! 
  6. *This is the point when you could freeze your dough!! Divide into portions, place into freezer bags, seal removing all air and freeze. To use, remove from freezer and let sit out to get to room temperature and double in size; 6-8 hours. Then use as you'd like. Lightly grease the bowl & the dough so it doesn't dry out, cover with plastic wrap and let it rise 1-2 hours. That's it! Use a-as desired.
For the Cheesy Garlic Bread Sticks-
  1. Preheat oven to 500 degrees with pizza stone inside. {If you don't have a pizza stone, use an upside down cookie sheet...a tip I got from Natalie!}
  2. Mix butter and garlic in a small bowl and set aside.
  3. Spread pizza dough out into a 12-inch circle on parchment paper. {This makes it easier to transfer to the pizza stone.}
  4. Spread the butter and garlic mixture over dough and top with parmesan and mozzarella cheeses. 
Source: http://www.laurenslatest.com/fail-proof-pizza-dough/

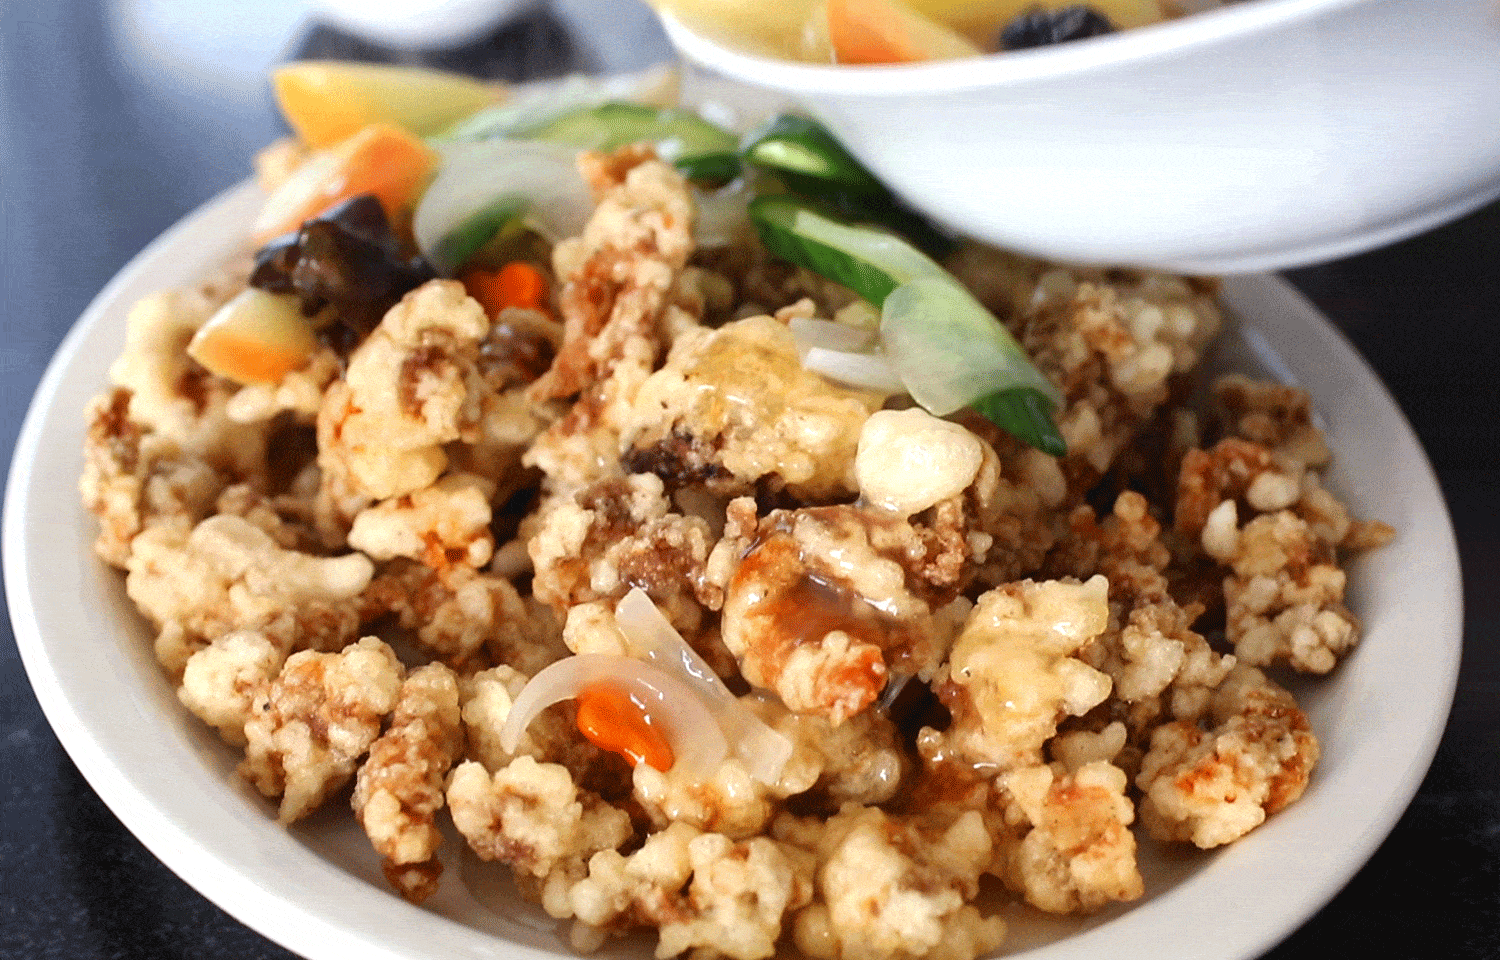
Sweet and Sour Pork (Korean Tangsuyuk)


Ingredients
1 pound pork shoulder or tenderloin, cut into 2 inch x ½ inch strips
1½ teaspoon salt
½ teaspoon minced ginger
¼ teaspoon ground black pepper
1 cup plus ¼ cup potato starch
1 large egg white

Sauce:
2-3 dried wood ear mushrooms, soaked in cold water for 1½ hour -cut to small pieces
⅓ cup sliced onion
1 small carrot, sliced thinly
⅓ English cucumber, sliced thinly
2 rings of pineapple (canned or fresh), cut into halves
1 small red apple, cored, and sliced into ⅓ inch thick pieces
¼ cup sugar (white or brown sugar)
4 cups plus 1 teaspoon corn oil or vegetable oil
1 teaspoon sesame oil
water

Dipping Sauce
2 tablespoons
3 tablespoons white or apple vinegar

Directions (Serves 4)

  1. Combine the pork, ½ teaspoon salt, the ginger, and the ground black pepper in a bowl. Mix well, cover, and refrigerate.
  2. Mix 1 cup starch and 3 cups of water in a bowl with a spoon. 
  3. Let it sit on the kitchen counter until the starch sinks to the bottom of the bowl and turns solid (about one and a half hour).
  4. Mix 2 tablespoons starch with 2 tablespoons water in a small bowl, and let it sit for later, to thicken the sauce.
  5. Fill a deep 10 to 12 inch skillet with 4 cups of corn or vegetable oil. Heat it up over medium high heat until it reaches 330°F.
  6. Take the pork out of the refrigerator and mix with the remaining 2 tablespoons of starch.
  7. Pour out the water from the bowl of starch that was soaking. Add the egg white and mix well.
  8. Add the starch mixture to the pork. Use your hand to gently mix it in.
  9. Drop the pork pieces into the oil. Use tongs to split them apart if they stick to each other.
  10. Fry in batches if you need to, until they are crispy and turn light golden brown (5 to 7 minutes). 
  11. There should be plenty of room in the skillet for them to fry without always touching each other.
  12. When done, transfer to a strainer set over a bowl to drain.

Make the sauce:
  1. Heat the 1 teaspoon of corn oil in a large skillet over medium high heat. Add the mushrooms, onion, and carrot and stir-fry for 1 minute.
  2. Add the apple and stir-fry 1 minute.
  3. Add 3 cups of water, the sugar, the vinegar, 1 teaspoon salt, and bring to a boil.
  4. Stir the small bowl of starch water one last time before adding to the sauce. Stir it in with a wooden spoon. The sauce will thicken and shiny.
  5. Let it sizzle for a few minutes and then remove from the heat.
Serve:
Mix 2 tablespoons soy sauce and 1 tablespoon vinegar in a small bowl, to use as a dipping sauce.
Heat up the oil and fry the pork for the second and last time, until they are very crispy and golden brown (about 3 to 4 minutes). You can crowd them in the skillet this time, but the color of the pork should be golden brown and shatteringly crisp.

Reheat the sauce over medium high heat until it bubbles. Stir in the cucumber and pineapple for 1 minute. Add the sesame oil and stir for 10 seconds.

Source: http://www.maangchi.com/recipe/tangsuyuk 

Friday, June 17, 2016

Ribbon Cookies - Chinese New Year

picture credit from house of annie

Ingredients
600g plain flour, sifted
100g or 8 tbsp margarine
2 tsp bicarbonate of soda
100g or 8 tbsp castor sugar
1 egg


Method
Put sifted flour, sugar and bicarbonate of soda in a mixing bowl. Rubb in margarine and add egg to combine. Knead into a dough and leave aside to rests for about half an hour.
Roll out the dough to about 1mm thickness or use a pasta roller. Cut the dough into long 5cm wide strips. Place the two strips together (on on top of the other lengwise) and into strips about 1.5cm width. Make a small cut or slit in the centre of each strip.

For each pair of small strips, push the top end of the strip into the slit twice to form a twisted ribbon. Do the same for the rest of strips of dough.

Deep-fry the ribbon dough in hot oil until golden brown and crispy. Drain and set aside on absorbent paper then store in an airtight container.

Directions:
To make sugar water:
1. Add 8 tablespoons of sugar in a pan and add 1 cup of water.
2. Heat until sugar is dissolve.
3. Leave aside to cool

Recipe adapted and modified from http://www.mymalaysiabooks.com/

Peanut Cookis - Chinese New Year


Makes about 55 cookies
Prep time: 30 minutes
Baking time: 15 minutes

Ingredients:
150g (about 5.3 oz) self-raising flour
80g (2.8 oz) icing sugar
1/2 tsp salt
1/2 tsp bicarb soda (aka baking soda)
1/2 tsp vanilla extract / essence
110g (3.9 oz) corn oil – that’s right, you weigh the oil!
80g (2.8 oz) hazelnut meal (it’d work with any kind of nut-based meal i.e. almond, peanuts etc)
1 egg yolk (or 1tbsp milk mix with 1 tsp water) – this will be the egg or milk wash

Method:
  1. Preheat oven to 170 degrees C / 338 degrees F. Line your baking tray with parchment paper. Set aside. 
  2. Sift together flour, icing sugar, salt and bicard into a large mixing bowl. 
  3. Stir in hazelnut meal into the flour mixture. 
  4. Using either a spoon or your hand, stir in oil and vanilla extract until mixture forms a soft ball of dough. 
  5. Mould the dough using a bottle cap. Line the cavity of a bottle with cling wrap and press dough into the cavity until it is level with the top of the cap. 
  6. Brush cookies with egg or milk wash. 
  7. Bake in the preheated oven for 15 minutes or until the top of the cookies have dried out and the bottoms are golden brown. 

Recipe from http://www.fussfreecooking.com/

Almond Thins - Chinese New Year


Ingredients:
1½ cups almond flakes
3 egg whites
2 tbsps canola oil
1/3 cup granulated sugar
1/4 cup all-purpose flour

Instructions:
  1. Bring the egg whites, oil, sugar and flour into a mixing bowl. Mix them up using a whisk. The batter will appear a little lumpy in the beginning. Keep the mixing going, it will smooth out in the end.
  2. Add in the almond flakes. Gently stir to mix them well with the batter.
  3. Line a baking sheet with a piece of heavy duty aluminium foil (its durability makes it easier to remove the almond thins post-baking). 
  4. Using the back of a spoon, spread the batter out as thinly as possible. Try to have an even distribution of the almond flakes in the process.
  5. Fold in the sides of the aluminium foil (if the foil's large enough to begin with). Or cover the sides with extra strips of aluminium foil. I tend to get a little too protective over the sides and thus the HUGE strips (5a) covering them lol. Just be sure to not let the aluminium foils come into contact with the batter or they will end up sticking to it making their removal difficult later.
  6. Bake in a preheated oven at 350°F for 16 minutes. At the end of it, the sides will appear to be a lot browner than the center (despite all the cover-up work!). Well the good news is that they are good to go!
  7. Carefully peel the large almond thin off the baking aluminium foil and transfer it onto a cooling rack (or another baking sheet). Let it cool for about a minute.
  8. It should have hardened considerably by now. Break the sides off. They should be all so crispy and brittle it feels almost effortless. With the sides, let them cool completely before storing them away. The remaining center piece? Place it back onto the baking sheet with the aluminium foil and bring it back into the oven uncovered this time. Close the oven, turn off the heat and let the remaining heat in the oven do its wonders.
  9. Check on the center piece 5 minutes later. Remove from the oven if they looked done, leave it for another 5 minutes otherwise. I work with a real old oven. Took me another 15 minutes before they get to the right hue.
  10. When done, let them cool slightly before breaking them down into smaller pieces. Now you can move on and reheat the oven to 350°F to work on the second batch in similar manners!
Recipe from: http://lengskitchen.blogspot.my/